
diy {bird nest necklace}

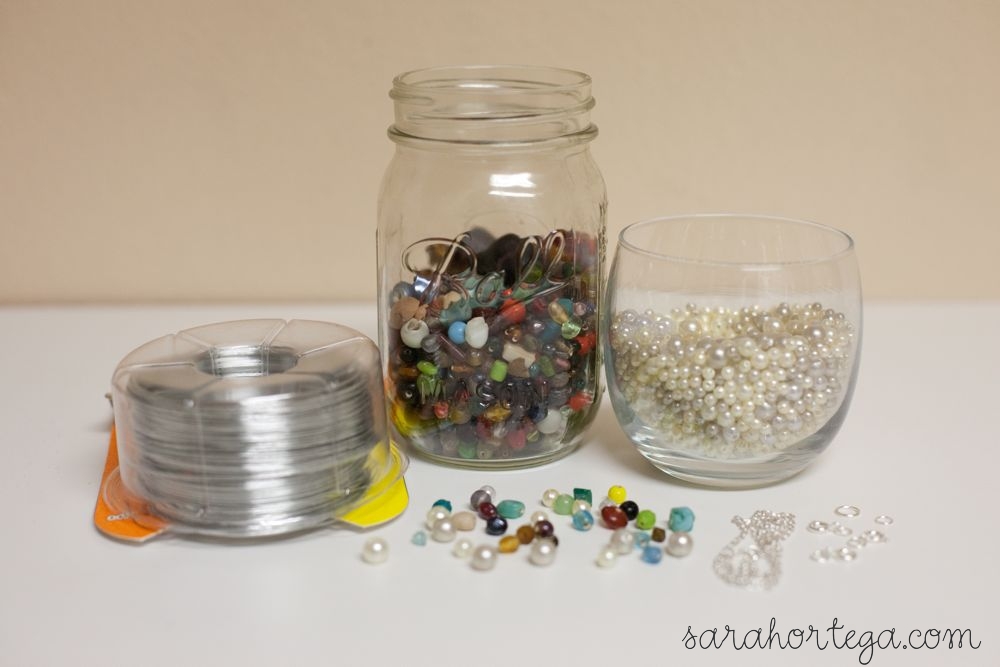
What you'll need:
- Jewelry wire (I prefer using a 24 gage because it is easier to manipulate but the 20 gage can work well too with the help of some round nose pliers)
- pearls or glass beads
- necklace chain
- jump ring and a clasp

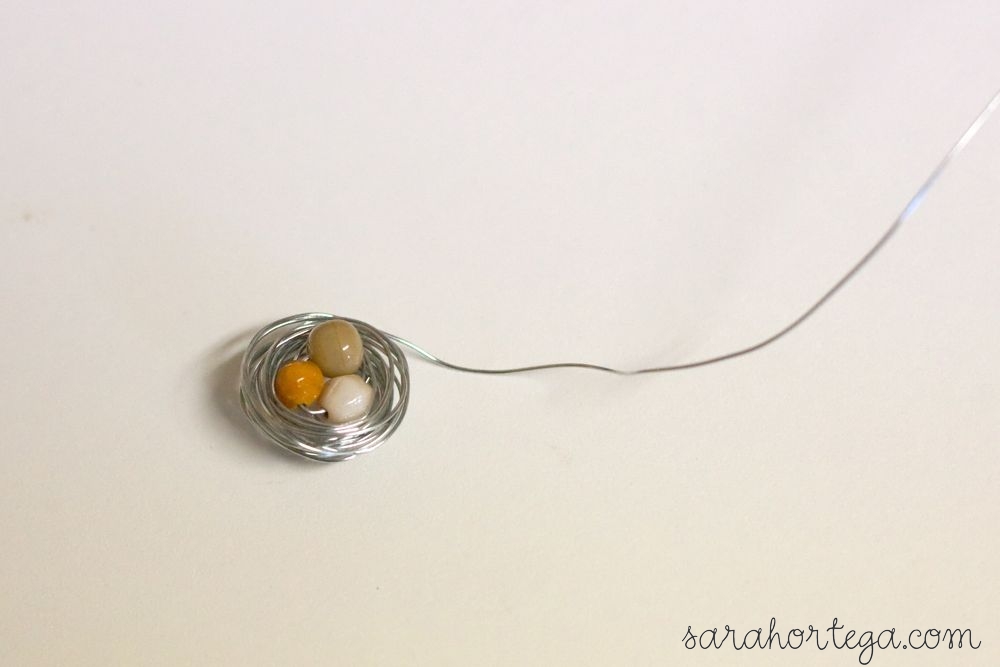


now attach a jump ring and a clasp to the end of a necklace chain 
and this is what you end up with :)


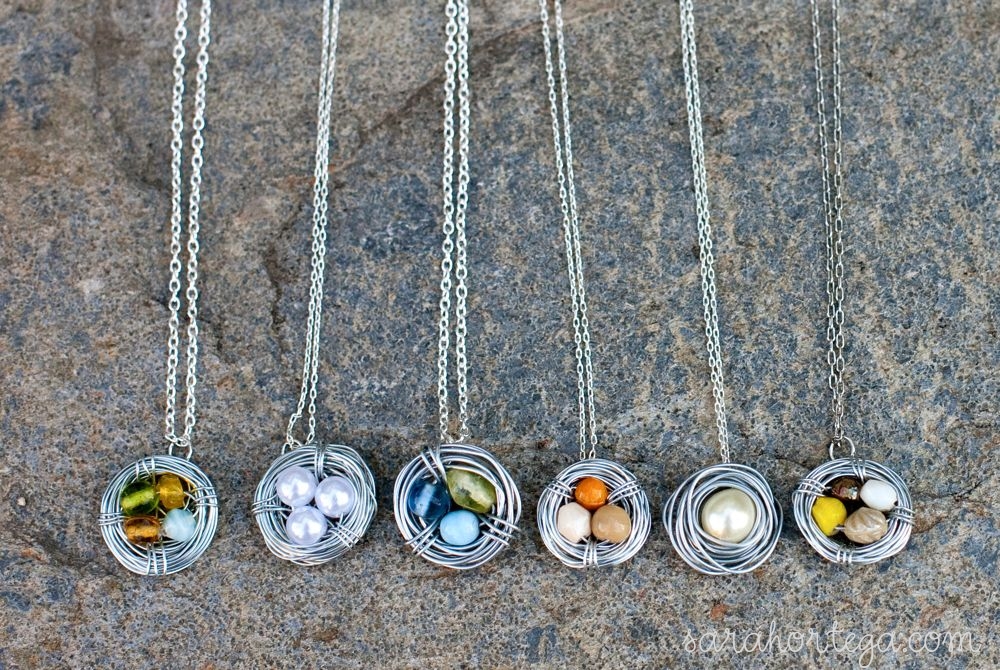
just to show you the difference between the 20 and 24 gage...
the two on the right were made with 20 gage wire and on the left is the 24.
The 24 gage is definitely easier to work with and manipulate and I like the delicate look of it but I also like the thicker look of the 20 gage

I think this one is my favorite

**Update: you can now purchase my bird nest necklaces via my online Etsy shop, poppy & pine. Cheers and happy shopping!
HI!
ReplyDeleteSeen your feature on craftgawker!
Wishin you had a google connect button so I could add it to my feed.
Your phot's are amazing!!!
Thanks for the great tutorial. I've been in search of the perfect beads to make myself one.
kristanlynn
Thanks for the tutorial! The necklaces look beautiful, I can't wait to try it out :)
ReplyDeleteGorgeous! I love how elegant and simple these look. Thanks for explaining how to make these beauties in such an easy way. :)
ReplyDeleteSaw you on gawker.
You're more than welcome to link up at the Sunburnt Cow link party.
Cheers,
Tracy All Thumbs Crafts
I can not wait to try this out. Thank you for sharing, I found this via craftgawker :)
ReplyDeleteHi, found you on craftgawker.
ReplyDeleteLove these necklaces!!
I'm so glad you posted this very simple tutorial. I've always like the birds nest necklaces, but they looked very difficult to make. I'm excited to try and make them now!
ReplyDeleteThanks!
Kasey
These are just lovely!
ReplyDeleteThank you so much for the tutorial! With these materials permanently on stock, you can never run out of gifts to give friends and family!
ReplyDeleteLove this! How do you care for these necklaces? Do they rust/fade quickly?
ReplyDeleteThanks,
Esther Dush
Hi Esther,
DeleteI've had mine for about a year now and they still look great. Even though the wire is rust resistant I still keep them away from water and don't wear them in the shower or pool.
awwww lovve it~!
ReplyDeleteOh my goodness these are gorgeous!!! Thank you so much for posting the tutorial. I'm heading out to the store today to make it :)
ReplyDeleteFab ideas...must find the time to try some of them out..new follower here xx
ReplyDeleteHi!
ReplyDeleteSo I'm a pretty avid crafter, and I love these necklaces! However, I tried to make one for my sister, and it didn't work very well. The nest part wouldn't stay tight as I was wrapping and kept slipping around, unraveling and forcing me to start over. Any ideas? I was using 22 gauge wire.
Thanks!
Hi Alyse, that's a great question!
ReplyDeleteWhen I'm wrapping the wire I secure the beads between my thumb (on the bottom) and my pointer and middle finger (on top.) As you wrap the wire it gets held in there too and will prevent it from slipping and unraveling. I hope that helps you out and if you have any more questions don't hesitate to ask :)
Thanks for stopping by!
These are so cute! Can't wait to make one!! Just wondering....what size beads did you use? I went into the store to look at some and was overwhelmed by how many different sizes there are!!
ReplyDeleteThx,
Sara
Hi Sara,
ReplyDeleteThanks for your question. I use all different sizes of beads depending on how many I am going to put in the pendant. If I make a nest with only 1 bead I'll select a larger one and if I'm going to make one with 4 beads I'll choose smaller ones. (Sorry, I don't know exact sizes or measurements.)
A good way to do it is to get an assorted pack of beads with a variety of sizes and colors (like this one) so you can try out different sizes and see what you like. Hope that helped!
thanks for the Tut! it's great!
ReplyDeleteI saw this on craftgawker and had to try it! My first try came out great. Thank you for posting!
ReplyDeletesarah u are very talented i can't wait to get to these crafts!!!
ReplyDeletelove vero!!!
Will you please just sell me the one with the one pearl? lolol
ReplyDeleteI found this link through craftgawker too! You are awesome! I made on for myself and love this tutorial! Good work on it and thank you for posting it!
ReplyDeleteThanks everyone! I'm glad the tutorial is working out for you all. I'd love to see pictures of your final products. (my email link is at the top of the page)
ReplyDelete@Katie I am in the works of starting up an Etsy shop so hopefully these (and more fun goodies) will be up for grabs soon :)
This is amazing, and so simple! I love the one with the single peral bead. Will be trying this myself, thanks for sharing!
ReplyDeletewww.i-cant-walk-in-heels.blogspot.com
Beautiful! I can't wait to get supplies and try this myself. Thank you so much for sharing the instructions. I love your photos, too!
ReplyDeleteGreetings from Ireland! Just "gawked" at your Jenga project on gawker and was led to your wonderful site! Your photographs are AMAZING! Beautiful and inspiring. Thanks for sharing!
ReplyDeleteWow! These are absolutely adorable, and I can't wait to make them! Fabulous job! Very inspiring!
ReplyDeleteLove these necklaces! I tried the tutorial while home sick, and it came out super cute! Definitely improved my day :-) Thanks for sharing!
ReplyDeleteI love this idea! Thanks so much for telling us how to do it! http://caribbeanmissionarywife.blogspot.com/
ReplyDeleteThese are absolutely gorgeous! Found you through stumbleupon. Off to the craft store...
ReplyDeleteThese are amazing. I have a friend who has been searching for a mother's necklace with 5 stones - to no avail. I can't wait to make her one of these. Thanks so much!
ReplyDeleteHola sara!
ReplyDeleteIl tuo blog è meraviglioso..
Un abrazo.
Fer.
Wow! They are lovely and easy to make. Thanks for posting
ReplyDeleteThese are SO CUTE!!! Thanks for posting!:)
DeleteLove, Love, Love!! I absolutely adore this! thank you.
ReplyDeleteomg i made two of these and everyone loves them! i found u on craftgawker-nice job!
ReplyDeleteI'm going to make some today and will defiantly wear these to my first day of high school tomorrow!! :)
ReplyDeleteBeautiful! Made a few of these with beads, wire and chains that I've had stockpiled for years! I even twisted some very thin wire (not sure of the gauge) around my 20g before I wound it around the beads and it adds some extra flair and color to it, especially when using pearls, clear or black beads.
ReplyDeleteThanks for the tutorial!
Oooh, these are so cute!! I love them. can't wait to try my hand at them! Thank you so much! :)
ReplyDeleteI love it! :) I'm trying this first thing in the morning!! :)
ReplyDeleteThese little nests are so pretty - I'm definitely going to try one myself. Thanks for the tutorial - saw it on Pinterest.
ReplyDeleteThank you for the tutorial. It was nice to see each of the steps.
ReplyDeleteThis might seem like a silly question, but do you know about how much wire you used for one necklace? I'm hoping to do this for a craft night soon and have no idea how much wire I'll need to get (there will probably be around 10 of us making these).
ReplyDeleteGreat tutorial, super cute necklaces!
@Ashley W that's a really good question actually. I'm not really sure how much wire I use per necklace, maybe a yard or two? Just a guess :)
ReplyDeleteYou should be able to find spools of jewelry wire at your local craft store. if there's 10 of you maybe get 20-30 yards just to be safe, always better to have some left over.
I hope your craft night goes well, I'd love to see pictures of all the creations :)
Do you know if this would be too much for earrings or not. I thought this might make a great necklace/earring combo for a Christmas gift for my mom using her grandkids birthstone colors
ReplyDeleteI just made one of your necklaces and I love it! I found your blog via craftgawker (thanks to stumbleupon) and I am so glad I did! I am new to all these awesome craft things and I am loving every second of it! :)
ReplyDeleteThanks again!
Gina
Mandy,
ReplyDeleteYes you could definitely do an earring necklace combo! I would just use smaller sized beads to make the earrings so that they don't come out too big. If you make a set I'd love to see how they come out :)
These are awesome. Thanks so much for sharing. Found it on StumbleUpon and then to Craftgawker. Can I sell these at a local charity craft bazaar or is this your own pattern/design? I'm not sure how that works but don't want to do the wrong thing. Thanks
ReplyDeleteThese are awesome and something I will try very soon.
ReplyDeleteFound you from Tutorial Tuesday on Daisy Chain designs.Thanks,
jenni
@Amy
ReplyDeleteThank you for asking! I have no problems with you selling these at the charity craft sale.
As for the pattern/design, I had seen various versions of bird nest pendants and this design is what I came up with to make my own.
Good luck on the sale!
Thanks again :)
my friend made me one of these and i love it! now i can make a varient of the one she made! yes! i found you on pinterest..oh my sweet pinterest! =) i'm a new follower! love your photography! i too a a photographer == self taught and total amateur but i'm getting there =) love your site!
ReplyDeleteJust made this for my mom's birthday... it came out great! Super easy and very pretty. Thanks for sharing!
ReplyDeleteThis is SO very AWESOME! I can not wait to make this!!!!!!!!!
ReplyDeleteThat is such a cute idea :) My 9 year old girl is into wire jewelry, she would love to use this tutorial. Thank you for sharing.
ReplyDeleteHi! I just tried making this and I'm having problems with the pearls looking scratched when I'm done. Any ideas...I'm making sure I'm not touching the pearls with the end of the wire, but I think it's how the pearls are rotating in the nest. Did you have any problems with this with pearls? Any suggestions?
ReplyDeleteThanks!
These are SO cute! I can't wait to make one for my mom, sister and myself. Our last name is Byrd, so I think they'll fit nicely :)
ReplyDeleteThese are amazing!! I had surgery last week and decided to try and make some of these to pass the time and they're beautiful! I am NOT artistic at all and I was even able to make this look amazing. I bought gold wire as well and love it with the pearls. I'll be giving these to every woman I know for Christmas :) Thank you so much for posting how to do this, you rock!
ReplyDeleteThank you for sharing the tutorial on these sweet nests necklaces! I have SO many "girls" on my list...this is perfect for Christmas gifts! hugs, Heidi
ReplyDeleteThis is nice. thanks for this. I'll definitely try this.
ReplyDeleteGreat tutorial and photos. Thanks.
ReplyDeleteHi Sarah- I ADORE these necklaces! I'm on maternity leave and plan to make these for all the girls in my family for Christmas! I have a silly question... Where do you get the chains for your necklaces? I couldn't find anything decent when I bought the rest of the supplies at Hobby Lobby.
ReplyDeleteThanks,
Jenny
these are adorable Sarah
ReplyDeleteI'm so excited to see your tutorial on the bird's nest necklaces! I just found it on Pinterest, and now I'll repin so more folks can see it.
ReplyDeleteGod bless your sharing, creative heart!
LOvely and easy!!!!
ReplyDeleteI made two of these tonight. They're the first pieces of jewelry I've ever made. I had the same problem with the pearls as a previous poster. I ended up painting over them afterwards with a pearly whit-ish nail polish to cover the scratched off parts. That helped a little, but I don't think I'll be giving that one as a gift. The second one used glass beads so no scratching, but I love the look of the pearls. I'm gonna have to figure out a way to make some without scratching them. Maybe if I paint them with the polish before I make it, they won't scratch as easily? Any ideas? Thanks for the tutorial. It took some practice with wrapping the wire (first time and all), but I got the hang of it after a little while.
ReplyDeleteThank you so much. You have a great tutorial here and giving the two gauges 20 and 24 sample was great. I'll try it. Dita.
ReplyDeleteHi Sarah! Just tried this a home and blogged about it. www.moondogtreasures.blogspot.com
ReplyDeleteI LOVE wire-wrapping. Thanks for a tutorial that explained this!
Susan
I love this and will SO be making a few as soon as I can get to the craft store for supplies!!
ReplyDeletei´ve tried it out! It´s adorable!
ReplyDeleteThank you very much!
Greeting
Lena
love this! thanks for posting! i want to make these for Christmas for my roommates :)- what did you do differently when making the single bead necklace?
ReplyDeleteI made this today because your directions were so wonderful! Thank you so much! I needed a quick gift for a friend who loves birds and nests and this is perfect!
ReplyDeleteThis is so cute!
ReplyDeleteGood job!
Wow I love this! I am totally making this for christmas. Thanks.
ReplyDelete@Chelsea R Hey Chelsea,
ReplyDeleteGlad you liked the tutorial. For the single bead necklace I simply just wrapped the wire around the bead and when I was happy with how it looked I just tucked in the end piece within the layers of wire. That's it! Easy Peasy :)
Thank you for the tutorial! I made some for friends and family for the holidays, and I posted a couple of pictures at www.onedogwoof.blogspot.com.
ReplyDeleteThank you!!! I just made the most adorable necklace-and it was SO easy! Everyone I know will be getting one of these for xmas this year!
ReplyDeleteI love this idea and can't wait to try it. I also really love the effort you put into the photos, like placing one of the necklaces on a plant. It makes me want to be more conscious of how I stage my own photos.
ReplyDeleteI'm really excited about making these as Christmas gifts! Off to Michael's in the morning!
ReplyDeleteI can't seem to get the Findings into the chain. the little loop is giving me problems... The chain seems to be too small although it's the same one you used (and the same findings) How did you connect the findings to the chain?
ReplyDeleteHi. Just want to start off by saying that I LOVE this idea. I am trying it out (right this second) but am having a heck of a time wrapping the "nest" part. I am using 24 gage wire but cannot seem to wrap it without it looking messy or the wire sliding off the beads. Any suggestions on an easy way of wrapping the nest? Thanks so much!
ReplyDeleteThank you so much for this! I ran out and got some beads and wire... They turned out sooo pretty.
ReplyDeleteI found your blog after seeing these on craftgawker. I saw them again when your tutorial was featured somewhere else and I FINALLY made these this morning. I LOVE THEM!!
ReplyDeleteI am a professor of ornithology and have been studying birds for years. I love all jewelry with birds, but most don't have this classy look. Thanks so much!!
@Lindsey R. I'm glad that you're enjoying the tutorial and trying it for yourself!
ReplyDeleteAs for your question, when I'm wrapping the wire I secure the beads between my thumb (on the bottom) and my pointer and middle finger (on top.) As you wrap the wire it gets held in there too and will prevent it from slipping and unraveling. Also I just turn the pendant and let the wire wrap around on its own... does that make sense? I hope that helps you out and if you have any more questions don't hesitate to ask :)
Thanks for stopping by!
@Lena That's a good question, after making a few necklaces I started using a really small jump ring to attach the chain and the clasp together and another small jump ring to attach the chain and a thicker jump ring on the other side. That makes it easier when you are using a thinner chain. Hope that answered your question. Cheers!
ReplyDeleteHi there! I pinned your necklace tute on Pinterest a while back ago, and planned to make them for sassy in-law gifts! Of course, it's Christmas Eve, and guess what I am just now doing?
ReplyDeleteMm-hmm, that's right. :)
So I am having the same issue as two previous posters with the 24 gauge wire slipping. I have tried to hold and move the beads and wire as you said, but I think I am missing something. When you say, "wrap", are you simply meaning moving the wire around the outside of the beads, or do you mean threading it up or down between two beads or through the center?
Even if I do not conquer this today (gah!) I WILL get this, because it is a full-on dose of Awesome! Thank you for your graciousness!
Hi Sally,
DeleteFor the wrapping I just move the wire around the outside of the beads. I wish I could be of more help... If you find that the wire is still slipping perhaps you are wrapping too tight? Maybe try a looser more relaxed wrap.
Let me know if that helps.
Cheers!
I just made one of these, and it turned out lovely! Thank you for this post :)
ReplyDeleteTe felicito por tan hermosos collares y te agradezco que compartas, ademas con un paso a paso tan bien hecho.
ReplyDeleteAun no veo otras trabajos de tu blog pero lo que a simple vista se aprecia es magnifico!!!!.
Te deseo un feliz año nuevo 2012 lleno de salud, armonia y creatividad
Oh my! These are gorgeous! I've never made any jewelry, but I definitely want to make these. I've already started looking at supplies online, but I have no idea on the specifics of some things. I'm comfortable with finding the beads and the wire, but I'm unsure on the clasps, jump rings, and chain. Are there different size clasps & jump rings to go with different size necklace chains? Or is there a pretty general size of all three that go with each other most of the time. I hope that makes sense! Thanks so much! I can't wait to make my own.
ReplyDeleteAmanda
Hi Amanda,
DeleteI like to use 4mm jump rings to connect the lobster clasp and 7mm jump ring to the ends of the chain.
For the nest pendant I use a 7mm jump ring to connect it to the chain.
For the chain it depends on your preference if you like a thinner or thicker chain. I personally like the thinner chains.
I hope that helped! If you have anymore questions let me know :)
Found your tutorial via A Holy Experience blog. I've been wanting a necklace like this to remember my 4 angel babies; in my heart I'm a mother of 5. I love this beautiful, serene way of honoring the dreams of my babies that weren't to be.
ReplyDeleteThank you for sharing! I only hope mine turn out as beautiful as yours.
What a lovely symbol of your children. Thank you so much for sharing.
DeleteBeautiful necklaces!! Thank you for sharing the tutorial :)
ReplyDeleteI made these for Christmas gifts this year!! Here is a link to the pics on my blog: http://everythingiwantandnothingidont.blogspot.com/2012/01/janky-home-made-christmas-part1-birds.html
ReplyDeleteThank you so much for the tutorial!!! xo
They looks great! I love how you wrapped them. Thanks for sharing :)
DeleteHere's a question for Sarah and others who have made this: How easy do you think it would be for a 10-11-year old girl? With help, could she create one inside of an hour? Thanks in advance!
ReplyDeleteHi Caroline,
DeleteI think that is definitely do-able! If someone is there to help her with the steps and demonstrate the process then I think a 10-11 year old could make one.
Let me know how it goes!
Here's a question for Sarah and others who have made this: How easy do you think it would be for a 10-11-year old girl? With help, could she create one inside of an hour? Thanks in advance!
ReplyDeleteHi! Im 12 and I decided to try out this necklace, and I'm 99% sure that I have the right wire. So I was working on it, everything is fine, until my wire breaks! I would just like to know: How do wrap the beads and make the loops without breaking the wire?
ReplyDeleteHello :)
Deleteare you using 24 gage or thicker? I have not tried thinner wire but perhaps it might break easier? What wire are you using? At what step did it break? I have never had my wire break so I'm not sure if I can be of much help but hopefully we can work it out :)
Thanks!
I am having the same issue with my wire breaking. I am using 24 gage but when I got to wrap the beads tighter it has broken or when I go and try to do the loops around the next to secure the wire - the side loops you made, it continues to break. i have used up quite a bit of wire already trying different ways to do it so it will not break but i keep getting the same sad frustrating result...
DeleteThank you for sharing this! Made some of my own, and shared your blog with my friends! :)
ReplyDeletehttp://brittanysmartin.blogspot.com/2012/01/diy-bird-nest-jewelry.html
Brittany
Your bird nest jewelry looks awesome! Thanks for sharing :)
Deletethese are really beautiful , I make necklace as well,if you are interested in please check: http://bettyshimalayanhandicrafts.blogspot.com/
ReplyDeleteI have been wanting to do this! I had a birdsnest necklace I purchased from a local jewlery shop that is now out of business. I haven't been able to find a good replacement. Now I can make it myself....I am so excited to start!
ReplyDeleteThanks!
I just LOVE these. very creative. thanks for sharing.
ReplyDeletereally good idea, I will try it soon.
ReplyDeleteSarah, I have never seen birds nests before this, and I LOVE them. I do jewerly, Christmas ornaments, ref.magnets, crochet, and will try any craft I think I might like. I can't wait to try the birdsnests. Thank you so much for PERFECT directions!!! :) <3 Peace, Nancy
ReplyDeleteLove your tutorial an photos - I am a lampwork bead artist and I have heaps of orphan beads lying around looking a little unloved - I think I might just make a few of there to use them up - Cheers Tania
ReplyDeleteHi Sarah - have just stumbled upon your blog - I am a lampwork artist and thank you for the beautiful photos on the tutorial - I think I might just have to make a few of these with my orphan beads that I have lying around here at the moment. - Cheers from OZ
ReplyDeleteThat's so good. Considering doing an earring version. Thanks for the idea. ^^
ReplyDeleteBeautiful necklace! I've been assembling all of the parts but I'm having trouble finding chain you can buy by the length. I've checked out my hobby lobby store and they didn't have any. Any other suggestions?
ReplyDeleteYou could use birthstone beads to signify each child you have, or grandchildren if there aren't TOO many...
ReplyDeleteI AM IN LOVE WITH THIS! Totally going out to buy supplies tomorrow :)
ReplyDeleteI AM IN LOVE WITH THIS! I'm going to get supplies tomorrow :)
ReplyDeleteLove this! I totally want one of these and I never thought about trying to make it myself. Who knew it would be this easy!? Pinning this for future use. Thank you!
ReplyDeleteI love your tutorial Sarah! Been a long time I was looking for this model with explanations. thank you very much
ReplyDeleteFlo
http://lartenciel.blogspot.com/
Hello there! Wow...I'm pretty sure you know this already but I think this tutorial is really cool. It gives me something to do with my wire and it looks great. Thanks so much for posting it.
ReplyDeleteQuestion: How do you buy the chain?
Thanks [=
Hi Sarah! These are adorable. I saw someone wearing one a while back and have been hunting to find them in stores. I was so happy to find this tutorial. I plan on going to the craft store tomorrow and trying out this project. I am actually making it for my best friend who is having her first child in a few months so will be making a nest with one egg. I was just curious if the nests with one egg in them stay together as easily since there is no wrapping detail around the beads? Is there a method that you do in the back to secure it instead? Thanks so much for sharing your creativity.
ReplyDeleteLauren
I went to buy wire online and found the correct gauges, but the wire also came in hard, half hard, and soft. Which do you use?
ReplyDeletethanks so much for a great tutorial. i definitely want to make one of these - really love them!! x
ReplyDeleteI love this!
ReplyDeleteI love your bird's nest necklaces .i have a question. After u put the beads on the. The end piece of the
ReplyDeleteWire where does it go ? How
Many times are u supposed to wrap the
Beads. My beads seem to be loose. Hope u can help me. Thanks. Judy
I just made this necklace on Wednesday night using your tutorial and it was so easy to whip together with the help of this post. Thanks for posting it - I LOVE my new necklace!
ReplyDeleteSooo awesome! Will try them tomorrow...
ReplyDeleteI will post a link to this tutorial and your pinterest-board in my blog... it's so great, i just have to show it to the german readers, too.
Have a nice day, Kate
That is so neat! I love the look and have made some myself as pendants, but you have made it so easy with your instructions! Thanks for sharing!
ReplyDeleteVery Easy Instructions! Love it!
CJ & Matt
Wonderful post! Thank you for sharing! Very Easy instructions! LOVE IT! I will post in my blog your link!
ReplyDeleteBlessings, CJ & Matt
Thanks, I made one for my friend's birthday.
ReplyDeletehttp://mistylynnwhat.blogspot.com/2012/03/birds-nest-beaded-wire-necklace.html
Thanks for the great tutorial! I saw it on Pinterest. I was planning to order some wire online and found a lot of choices. Do I need sterling silver? Then for the 24 gauge they listed: dead soft, half hard, and full hard. Any suggestions on a good choice??
ReplyDeleteThanks so much,
Michele
Hello Sarah!
ReplyDeleteI loved those necklaces so much, I did one myself (and linked your tutorial). You can see it here: http://paperdollsquared.blogspot.com/2012/03/ultimo.html
Have a wonderful day!
J.
Very cute idea and simple too! TFS~~~I will have to try this out with my 10 year old granddaughter.Her creative juices have really started to flow. I think she will be able to do this project with limited help.
ReplyDeleteI added the nests to tulle and a headband. I linked to your tutorial in my post here:http://www.blogger.com/blogger.g?blogID=7803993930847489024#editor/target=post;postID=7883270865996083268
ReplyDeleteI just made two...thanks for the idea! It will be a perfect Mother's day gift :D
ReplyDeleteYou have amazing talent.
ReplyDeleteI will be a new follower :-)
I just made one! Great tutorial! Thank you! :]
ReplyDeleteFound it pinterest. Thanks! I just made one, and you provided a great tutorial.
ReplyDeletethese are so adorable!
ReplyDeletehow did you do the big pearl one that has no loops around the wire? how did you get it to stay?
So so cute! I love these and can't wait to try! And I love your blog, I'm new but you have some adorable projects and I look forward to looking around!
ReplyDeleteWhat a lovely DIY! so easy, thanks for the tutorial! I linked back to your tutorial in my post here:
ReplyDeletehttp://lacedwithreality.tumblr.com/post/21154401133/birds-nest-wire-necklace-another-weekend
I absolutely LOVE this idea. This will make an awesome mother's day present!
ReplyDeleteWhat a fabulous and genuine idea! Thanks so much for the tutorial! Cannot wait to try to make one! Thanks!
ReplyDeleteWhat a great idea. Thank you so much for sharing!
ReplyDeletethat is so adorable! Thank you for sharing!!
ReplyDeletethat is so adorable! Thank you for sharing!!
ReplyDeletethat is so adorable! Thank you for sharing!!
ReplyDeleteYour pendants are so pretty. I especially like the large single pearl. I made earrings using colorful freshwater pearls. http://www.etsy.com/listing/98430170/birds-nest-earrings-free-shipping
ReplyDeleteI found this via pinterest, but I actually found another blog that had the same idea first. I felt your tutorial was much easier to follow which inspired me to make three, all for mothers day. I appreciated also that you showed a lot of different options because I am a very visual person especially when trying something new for the first time. Thanks!
ReplyDeleteThanks, My daughter and I made these today for all the grandmas and Aunts for Mother's Day. She is five and this was simple enough for her. We made them into little brooches as I had pins and no jump loops. They look very dainty and elegant when pinned to a blouse or blazer collar.
ReplyDeleteThese are so sweet! We are going to make them with a homeschool art class tomorrow. Thank you!
ReplyDeleteAww... So pretty!! I tried it out and it went almost exactly like yours :3
ReplyDeleteThese are wonderful, thanks for the inspiration, might make one for my mum, but might also be a great gift to a mum-to-be! =)
ReplyDeleteHugs, Elenor
Hi - the big "reel" of wire - approximately how many necklaces do you think it would make? I'm thinking this would be a great Mom's Craft Night project!!
ReplyDeleteLove this tutorial. These are so beautiful. Definitely going out to look for all the supplies tomorrow. Can't wait to treat myself for mother's day :)
ReplyDeleteThank you ! I love these....made one for the Mom's in my life....cannot wait for them to see them! I used glass beads to represent the months of their children's birth....looks great and will have such a wonderful meaning.
ReplyDeleteFound this link on pinterest and just made three for teacher gifts! Thanks for a great tutorial! Uploading pictures to my blog now.
ReplyDeleteLove this!!! So cute, and personable!
ReplyDeleteHow fabulous! The nest idea is so clever and they turned out great. I'm featuring these necklaces on my blog as a great Mother's Day gift idea! http://www.diynewlyweds.com/2012/05/mothers-day-gift-ideas-giveaway.html
ReplyDeleteI have never made a necklace but I want to try yours... its so different!!
ReplyDeleteFreshwaters Pearls
wow, they look so pretty! Thank you very much for the tutorial, I linked it in a series I'm writng for my blog (http://rock-n-roll-stops-the-traffic.blogspot.it/2012/05/diy-from-head-to-toe-9.html#more), hope you don't mind :D
ReplyDeleteThank you so much for sharing this tutorial with us! I made this for mother's day tomorrow: https://plus.google.com/photos/100580869289139873605/albums/5741789630726404801
ReplyDeleteI chose 4 crystal eggs to represent me and my three brother's birthstones: sapphire, emerald, amethyst and opal. So excited to give it to her!
Thank you for providing this! They are beautiful and I made some for my bridesmaids! You are very talented and we appreciate you sharing the tutorial. :)
ReplyDeleteThanks for the tutorial, I just made one and it turned out fabulous ;)
ReplyDeleteI made these with my kids today. I absolutely love them. What a great idea.
ReplyDeletehttp://www.facebook.com/photo.php?fbid=10151734214705032&set=a.10150911322415032.762728.871590031&type=3
This is how my earrings turned out. Thanks for sharing.
Such a lovely tutorial! I made these as well and featured them on my blog...making sure to credit it back to you of course. Thanks for the fantastic idea :)
ReplyDeleteThanks to share this!
ReplyDeleteSo cute!!! :)
ReplyDeleteI'm really excited to try this! I have pretty much everything I need, but I can't find nice glass beads ANYWHERE. Where did you get these? Thanks!
ReplyDeleteThe glass beads that you see in the mason jar in the supplies picture is from a tub of glass beads that I found at Michaels called "Mass O Glass."
DeleteAwesome tutorial and gorgeous pendants. I made one with pearls, and it came out beautifully! I was looking for some nice combinations on your store and I just love the robins egg one. I've been to ACMoore and Joann's, and neither has turquoise beads that look like that. May I ask where they are from? Thank you!
ReplyDeleteI love this project so much - and you tutorial shows that it's totally achievable for young adults - I hope you don't mind but I posted a link to this blog post as the perfect teen-party craft project on my facebook page:
ReplyDeletehttp://www.facebook.com/pages/Partycraft-Secrets/239045209469228
I just made three of these and they look absolutely adorable. Thank you for the tutorial!
ReplyDeletecool... looks really easy.. gonna try and make it. thanks for the tutorial...
ReplyDeleteI do not speak English, but I'll try to tell you in your language that you do is amazing, and you are very generous in sharing things with others, that God returned everything I share with thousands of blessings
ReplyDeleteHugs
Laura
laurarugeles61@hotmail.com
Thanks for the tutorial, yours look amazing, but no matter what I do I cant seem to get it right.. it's like either the wire slips completely on top or below of the beads and the wrapping looks very messy!
ReplyDeleteThis is so cute!!! I need to try this out!! Hopefully I am craft enough because I absolutely love these!
ReplyDeletehow do you secure the wire when you string the beads - tie it after the last bead?
ReplyDeleteOk, just made my first one, not half bad for my first attempt. Now I just need tomake eight more for my four sister-in-laws and 4 nieces so we can all match and be "birds of a feather". Thank you for this great tutorial. Much appreciated.
ReplyDeleteKaren
Love this. I am going to make two. One for a friend as a joke because she has a fear of birds. I will attach a note of when her birds should hatch. Ok, I know that is mean, but she does have a good sense of humor. The other one is for me because I own birds and love this. Thanks for the tutorial.
ReplyDeleteYou are so creative!!! I will definately be checking in on your blog now from time to time. Thanks for the great ideas..you have inspired me!
ReplyDeleteThis is very cute. We wish to feature your tutorial on our blog one day if permitted. Should you have any questions, don't hesitate to send us an email.
ReplyDeleteThanks,
Diybeadingclub.com
Diylessons.org
Handmade-Jewelry-Club.com
I've had this silver chain, blue beads and wire for ages wondering what to do with them. Thanks to you, I utilized them in a wonderful way and made one of your spectacular necklaces. Thank you!
ReplyDeleteThis is so beautiful! I made one for my mother and she loves it! I posted mine to my blog and linked this wonderful tutorial! Thank you!
ReplyDeletehttp://thechicconfessions.blogspot.com/2012/08/diy-birds-nest-pendant.html
Love it! These are so pretty. I really like that you can make them coordinate with any outfit.
ReplyDelete-Pricilla
www.pricillajdesigns.com
preciosos, gracias por compartirlos
ReplyDeleteI tried this out, it looks SO much easier than it actually is, but I agree the necklaces are so cute and even the one I made isn't that bad.
ReplyDeleteLove them:)
ReplyDeleteI love those necklaces! Cute as can be! I also love photography, carts and crafts (Everything Crochet on Facebook) and DIY stuff and funny thing is, I'm Ortega too!! :)
ReplyDeletehi
ReplyDeletethis a lovely idea! gonna make my sisters one each
can you tell me what type of wire you used (ie, German style,aluminium,ect)
thanks
Just wanted to let you know that our middle school craft club will be tackling this project tomorrow! Thanks for sharing your amazing tutorial!
ReplyDeleteOnce I saw this tutorial I could not stop making these! Using the beads that are slightly bigger than seed beads and wire that is 30 gauge is also really fun!
ReplyDeletethis is beautiful my daughter and i are trying this !
ReplyDeleteI made this for my mom for christmas last year and she loves it. I put 3 beads in it the colors of mine and my 2 sisters birth stones. And then I made 3 for a friend of my moms (one for her and one for each of her daughters) because she liked my moms a lot.
ReplyDeletelove them, have made a couple now! they've turned out really well. it IS a pain in the butt to try to get the wire to stay around the beads as you form, but you get the hang of it! :) thanks for the idea
ReplyDeleteI have a question for you Sarah Ortega, where did you get the chain for this?
ReplyDeleteHey Danielle!
DeleteI got these chains at Michaels :)
I love this! Thank you for showing us how!
ReplyDeleteHi!
ReplyDeleteI can't seem to find any "cool" looking chains--where did you get yours? Thanks!
Hello!
DeleteI found these chains at Michaels.
Etsy.com is also a great place to look if you can't find what you're looking for at a local store.
Found your link through MoneySavingMom.com ... What an easy turtorial! Thanks!!
ReplyDeleteThese are beautiful. I was just looking at one of these on etsy, and was contemplating buying it. I can't wait to make one of my own!
ReplyDelete