diy {freezer paper stenciling}
I have been meaning to give this project a try ever since I first learned about the cool things you can make with freezer paper. First of all, if you have never heard of freezer paper before, it is paper with a waxy finish on one side (not to be confused with wax paper which is waxy on both sides) and it can probably be found at your local grocery store right next to the aluminum foil and saran wrap.
The cool thing about this paper is if you place it with the waxy side down and iron it onto clothing or fabric it will stick! The adhesion is strong enough to stay on but light enough that you can easily pull it off when you are done with it.
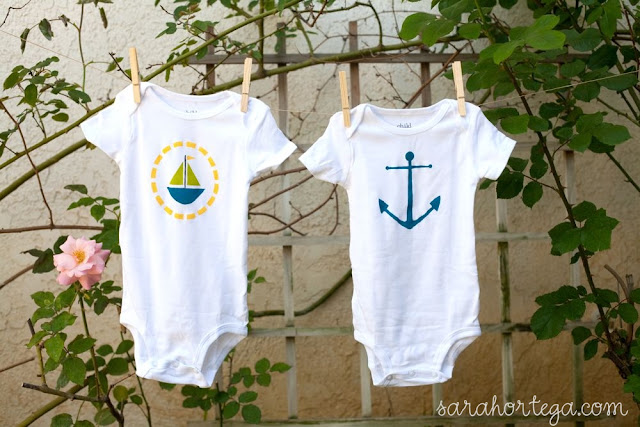
I tried out this stenciling technique on some onesies for a baby shower I went to last weekend. I was so pleased with the results and I can't wait to try this on other things like pillows, canvas totes, shirts, cloth napkins... the possibilities are endless!
Ok so here is what you'll need to make your own stencils:
-freezer paper
-iron
-fabric paint
-makeup sponge/foam brush/small paint brush
-an electronic cutting tool (I used my Silhouette SD) but if you don't have one an exacto knife will work just as fine.
First I chose the images I wanted from the silhouette online store, laid my freezer paper waxy side down on the cutting mat and had my silhouette cut out the images. If you don't have a digital cutter then simply trace the image you want onto the freezer paper and cut it out with an exacto knife.These are the images I chose. I was going for a cute nautical feel as you can see.
I ironed the stencil shiny side down onto the front of the onesie.
Then I put some cardboard inside the onesie to protect the back and painted away!
Because of the adhesive seal from the freezer paper you don't have to worry about the paint seeping through the edges. Lovely.
I let the paint dry overnight and then carefully pulled off the freezer paper.
I was so happy with the way they turned out! Very cute.
To give them as a gift I nicely folded them up, tied them with some twine and placed them in a brown paper bag. I embellished the bag with a doily, a cute little bird (cut out from my silhouette), and I used galvanized steel wire (20 gage) to spell out the baby's name.Now go try your own! And if you do I'd love to see what you come up with :)


Love the freezer paper idea! Just so you know, Sharpie permanent markers also make very cool looking, long lasting designs. Just run your item through the dryer on high heat to set it before washing.
ReplyDeleteThis does look easy...another project to try! Thx for posting :)
ReplyDeleteYou can also put fabric through the printer if you adhere it to freezer paper. Oh the possibilities!
ReplyDeleteYou can also print onto fabric from a computer printer if you adhere it to the freezer paper first. Oh the possibilities!
ReplyDelete